Today, I want to go over how to concatenate your videos. I am using a PC with windows 8.1, but FFMPEG also works with Linux and Mac. Only the last step is unique to windows.
To me, this really isn't as complicated as it sounds, but there are a lot of steps so this may not be for the faint of heart.
Also, from what I understand if you install FFMPEG the wrong way, it could lead to your computer to not load properly. The author of this article is not liable for anything that happens if you go this route.
Enough of the disclaimers! For the advanced user, it's an invaluable tool to have in your collection.
I want to thank and acknowledge Jim Watters, I stumbled upon his method in a Video-Stitch forum after searching for a better way to concatenate (I was using a paid program that could only do one at a time).
There are several ways to concatenate videos, but most of them only allow you to concatenate one video sequence at a time. The FFMPEG way, allows you to concatenate as many video sequences as you want, all at the same time. Plus it's FREE, so we highly recommend it!
In this video, I explain concatenating and show you my prefered method.
To install the software and batch files needed, continue reading the blog.
Concatenation is a process where you join multiple videos without re-compressing (which degrades the quality). For 360 video this is especially important if you are filming with cameras like GoPro's, that have a 4 Gb limit due to FAT-32 file allocation.What happens if you go over that 4Gb limit is that your GoPro makes a new file. So if you have a situation where you need to film continuously for several hours, instead of ending up with 6 really long files, you'll end up with something like 24 different files, broken up into 4GB each, with the last one being a little smaller.
Before we get into it, Kolor just released Autopano Video Pro 2.3.0 beta, which has an importer that concatenates the files while importing. I will test this feature soon and let you know how it works, but even if it works like a charm, there are still many instances where being able to concatenate is a great tool. One example is if you have footage already shot that you need to concatenate, another is if you don't have AVP loaded on your computer when you first dump your footage and a third is, you can make a video, then add intro and credits without having to re-compress your video. In short, it's a great tool.
The first step is to download and install FFMPEG. This isn't as straightforward as it sounds, but there's a great article that gives step by step instructions here.
The only thing you need to do differently is to instead of putting the FFMPEG folder directly on you C drive, put them in C:\Program Files.
So if you were to dig into the directory it should look like this:
C:\Program Files\ffmpeg\bin\ffmpeg.exe
Once you've followed all of those steps, you can use the command line tool to do all sorts of compression and concatenating. To find out more about FFMPEG, go to their website. If you're not a coder, like the author of this blog, then the next step is especially helpful for you, but coders follow along too.
Jim Watters made a batch file that works really well, to use it follow these steps.
Then paste this file in your Send To folder. If you don't know how to get there, paste this into file explorer: %APPDATA%\Microsoft\Windows\SendTo
After you've done this last step, you can literally select the videos you want to concatenate, right click, send to, concat videos
FFMPEG will ask you to specify a name and your videos will automagically start concatenating, and you can do this with as many videos as your computer will handle.
To change the location of where your files go, find the ConCatMovies.bat file, right click, edit and where it says
"set "IMAGETEMP=c:\temp\"
just change c:/temp/ to wherever you want the files to go. I usually create a Concat folder on an external drive and change the destination, so it will look something like:
"set "IMAGETEMP=h:\concat\".
Also a good thing to note is when you are selecting the clips to concatenate, make sure select from last clip to first clip, for example with four clips named 1,2,3,4 that you want to join, you would select 4, then 3, then 2, then 1, or shift select 4 then go to 1.
The reason for this is what ever the last clip you select is, this will be the first clip. So if you were to select 1,2,3,4 instead, it would join them as 4,1,2,3 because 4 was the last thing you selected.
Always check the order in ffpeg before you start the process.
Look at the end of the file names, Ep1 should be first, but the order is incorrect.
If selected in order from 1,2,3, ffmpeg will put 3 first, then 1,2...
So always select backwards, 3,2,1 etc.
Thanks again to Jim Watters for this great way to concatenate.
I hope this article is helpful for you and if you get stuck anywhere, comment below and I'll try to guide you in the right direction.
We've found that if we are using a 2 or 3 camera rig, both programs work fine for syncing, but with seven cameras, both programs have trouble and even when it says "it SEEMS reliable" we've found out later that it's not.
And there's nothing more frustrating to me than to spend a long time trying to fix a stitching error, only to discover that the sync was off.
In Premiere, not only can you sync very quickly and efficiently, you can SEE that it is in or out of sync, which is a feature I hope will be implemented in the stitching software soon.
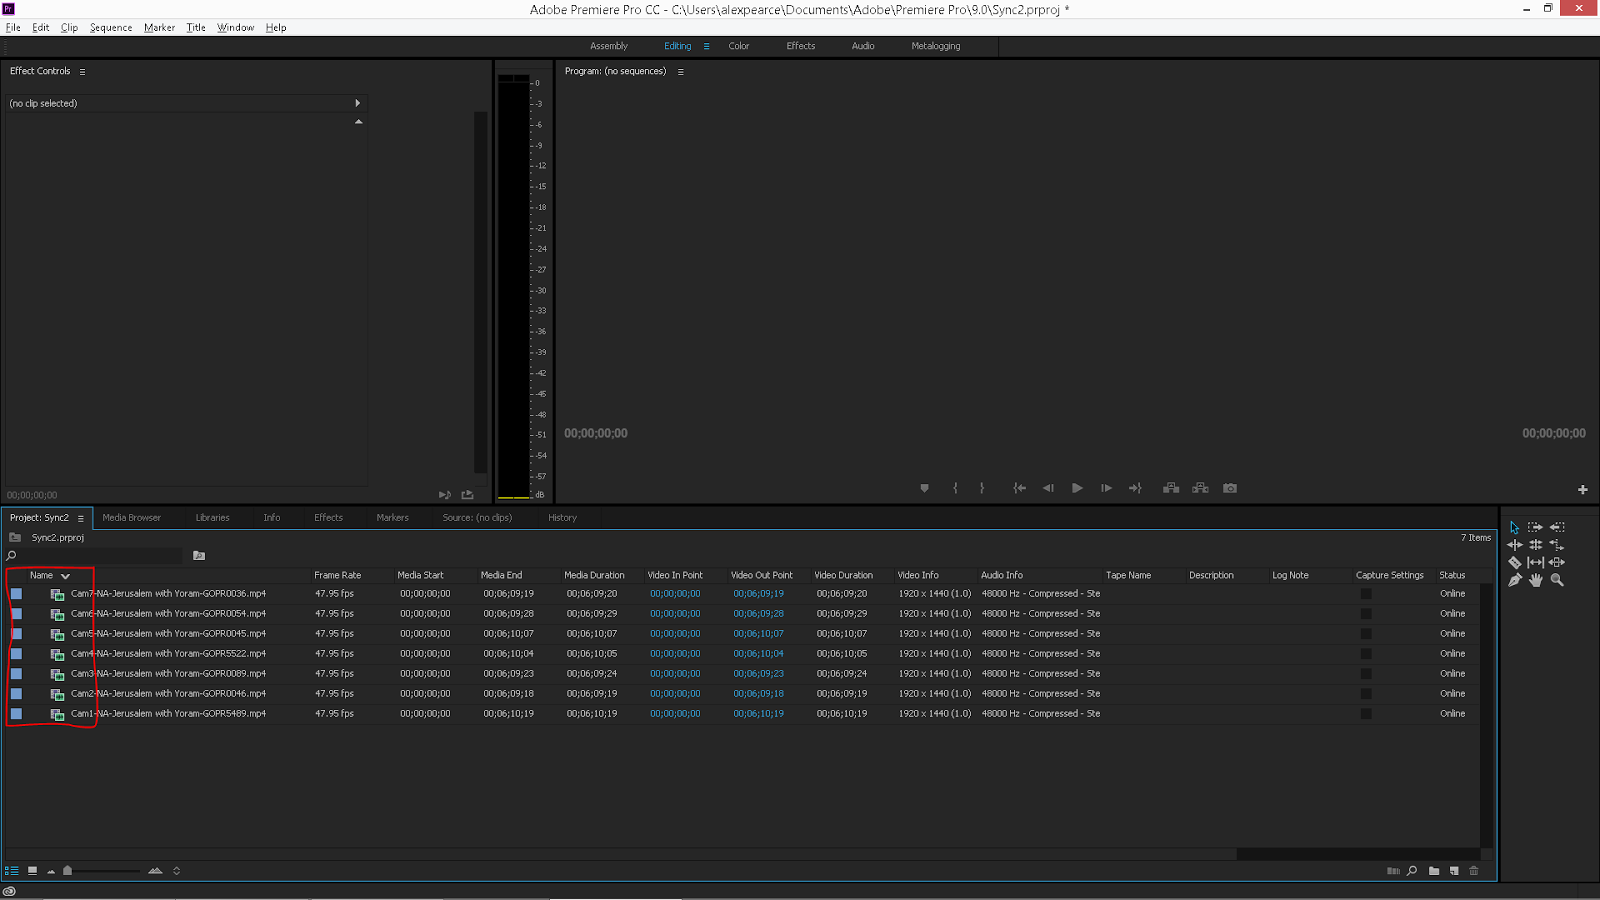
Step 1 - Import all footage.
Step 2 - Sort by name in Reverse order. For example instead of camera 1, camera 2, etc. sort by camera 7, camera 6, etc.
Step 3 - Select all - right click - create Multi-Camera Source Sequence.
A box will pop up with multi-cam settings. Under "Synchronize Point" select audio and under "Sequence Settings" choose "All Cameras". Click OK.
Step 4 - Right click on the newly created Multi-cam Sequence and choose "Open in Timeline". Make sure Camera 1 is on top and your last camera is on the bottom.
Step 5 - Right click on the Playhead Position and change to read in frames.
Step 6 - Check synchronization.
To do this, expand your audio files by holding shift and dragging the audio tracks bigger.
Then zoom in on the timeline where there is a clap or other loud, distinguishable audio peak. If you need to, realign here.
Step 7 - Lock off the audio tracks by holding shift and clicking on the lock on the far left of the timeline.
Step 8 - Drag all the files to match up with the LAST file on the timeline. Zoom in as far as you can to make sure they are all aligned.
Step 9 - Enter those numbers into Autopano Video Pro or Video-Stitch frame offset exactly as they appear.
Step 10 - Save this information in a text document or screenshot, and in the folder where the video files are. That way you will always have your sync information with all your files.
Special thanks to making360, we've modified our approach a little and I believe this is the most efficient way to correctly sync all videos and be sure they are as close as possible.
Frame rate directly effects syncing. If you are shooting at 30 frames per second, the sync can be as much as 1/30th of a second off. 60 frames per second or more is preferred for syncing, but of course there are several other factors to consider when choosing your frame rate (exposure, resolution options etc).
Today I will talk about ingesting and logging (organizing) 360 videos using 360CamMan2 by 360Heros.
Data management has always been important in video production, but with 360 video, it becomes exponentially more important, so even if you don't use this software, you should spend some time to come up with a system that works for you.
360CamMan2
360CamMan2 by 360heroes (version at time of writing is 2.2) takes out a lot of the leg work in data management. However, it is not without flaws. I will not spend a lot of time going over the advanced features I will just give you an overview of the program and give you my opinion on whether it's worth $225 or not. For information on all of it's features and tutorials, check out their website.
First off, it doesn't matter what camera you are using, whether it's 360Heros or Freedom360, or even if you've made your own rig. 360CamMan2 lets you build whatever rig you are using. And if one of the settings is off from the cameras, it will let you know in the Video Organizer.
One of the great things about CamMan2 is that you can format your cards so that each card is numbered 1 2 3 4 5 6 7, etc. This really helps when you are ingesting your footage to know which camera goes where. What we do is plug in a multi USB 3 port to our workstation, and then plug in all sd cards. They are all clearly labeled so we can see all cameras and there is no confusion about which camera it is. After you've shot as well, you can format them all at the same time, at least in theory. I haven't gotten this feature to work at all in version 2, and continue to use the first version of CamMan for this function. It's kind of annoying, but it still beats putting them all in the cameras and then formatting through the GoPro menu.
The very first test I ever shot in 360, I didn't have 360CamMan and accidentally copied the same sd card twice. It looked like I had all the footage, but after I formatted the cards, I realized my mistake. This wouldn't have happened if I was using 360CamMan. Of course it's possible to make sure you have all your footage without their software, but for me, it's a great peace of mind, especially when I have a demanding deadline or an early call time.
Even after several updates, this program is still buggy, and although we've never had any issues when we have ingested using their system, the program has crashed on us several times in other areas, so we don't trust it to rename our files while ingesting, at least not yet. But they have another tool that converts existing footage to their file naming system. So if you have footage before you get the program, you can still use the program to help you organize.
What we do is copy all of our footage into folders labeled Cam1, Cam2, etc. and then we go to "Conversion and Video Tool" then "Convert to 360CamMan". This renames all the files from "GoPro0000" to 360Heros file structure, which includes camera number, take number as well as the original GoPro file name. At this point, we are able to use their Video Analyzer to move all the files into different folders, and this is really the meat of this program.
So let's say you shot 20 different setups with 6 cameras. That's a 120 files that are unorganized and without 360CamMan, it can hours to get them all organized by the correct take, especially since most of the files are all named very similar (Gopro0503 or similar).
The analyzer will help you move those 120 video files into 20 new folders, organized by each shot of that day. This can save you a lot of time! When we shot in Israel, we ended up with well over a hundred different takes, and if we would have had 360CamMan2 then, we could have literally saved twenty hours or more of reorganization, so the time saved adds up quick.
The other great thing about the analyzer, is that it allows you to see the takes before you move them, and you can quickly see if you had an extra file that doesn't belong. They have a feature where you can move the files back and forth, which is an excellent function, and I look forward to seeing how they improve this tool.
360CamMan does have a way to merge videos into one file, which is a great idea, but it only allows you to do one merge at a time so we do not use this feature. Still, it's effective and especially if you are not a tech savvy creator, this is an easy way to concatenate files.
We use a different method that allows us to do as many as we want, through FFMPEG. If you want to know about this method, leave us a comment and I'll point you in the right direction.
There is also a way to Build 3D side-by-side, if that's something you're into.
They have a video Sync Offset tab, but it's honestly an extra step than needed. You have to go to Premiere do some work, then go back to 360CamMan.
The Bottom Line:
If you are shooting constantly or go on multi-day shoots, I strongly recommend buying this software. At $225 is it more expensive? Yes, but it will save you enough time and headaches to be worth it.
If you are a hobbyist, don't shoot very frequently or don't have any deadlines to meet, I would save your money and wait to make the decision until you do need it. By then, the software will have changed and there might be a better solution all together. My guess is Video-Stitch and Kolor will implement some sort of feature like this in their software eventually.
You can also do batch renaming in Adobe Bridge, Finder or File Explorer as an alternative for now, to help expedite the process for little or no cost, message me if you are interested in some tips.


